I wanted to share with you some of my earliest milk paint projects to show how easy it is to get that rustic farmhouse look that I love so much.
It felt easy, especially in comparison to my first attempts to get that look before I learned about milk paint. I tried to achieve it using regular paints from my local hardware store. Although the end result was OK, I didn’t love it and it took a lot of effort.
I started prepping by sanding my piece so the paint would adhere. I painted a black undercoat and let that dry for a day, then painted a white shade over the top. Another day goes by waiting for that to dry.
 Now comes the hard part! Distressing the white paint to let some black paint and a little of the natural wood show through was really difficult when using standard latex paint. Sanding, sanding, and more sanding to finally achieve something close to what I wanted. I wasn’t happy with the brush marks in the finish, but at least my arms got a workout!
 ![]()
Flash forward to my daughter asking if I’d like to take a milk paint workshop with her. Um … YES PLEASE! I’d heard of milk paint and chalk paint, but I didn’t really know much about them or how they compared. To learn more about what milk paint is, click here.
The class showed us how to mix the paint and how we could vary the look by adding more or less water. We learned how to layer colors and how to create a resist in spots to get that chippy look. We also saw various topcoats that could provide different finishes for even more variations.
We practiced on pieces of scrap wood and we each took home a finished project of a coat rack (a milk painted board with hooks) to hang on the wall. All within one afternoon! Yup, I was hooked!
Now it was time to put what I learned to use on an actual refinishing job. Still unsure of myself after my previous attempts, I wasn’t feeling ready to tackle furniture, so I looked for small things around the house.
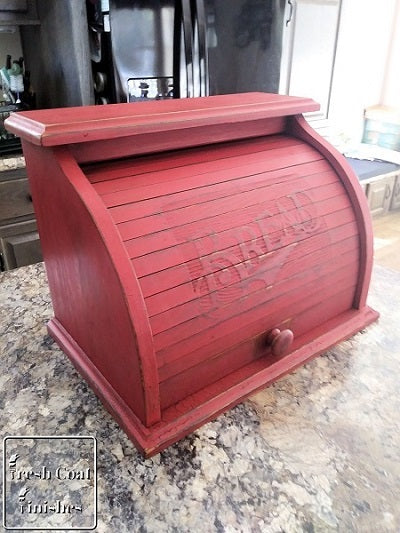
What was my first milk paint project? I can't say for sure, but looking back through my photos now, the first project I took pictures of was my breadbox. It was made of stained wood and looked a little  like a roll-top desk. It had a nice bas-relief area that said “Bread” that I thought would distress well. I only wish I had taken a before picture!
I started out by painting it with a rich brown milk paint. That’s right, no prep sanding, just a good cleaning beforehand.
It dried quickly, and I painted it with a beautiful red color called Tricycle. The second coat dried in no time, and it was time to distress.
A light sanding along the edges and over the bas-relief area brought out the character and made this reproduction piece feel like a family heirloom. I gave it a topcoat of antiquing wax and it was done!
In hindsight, I probably didn’t need the brown undercoat. That was mostly me clinging to my past practices of thinking I needed to layer two colors.  The original stained wood would have been enough of a contrast to show through the distressed red paint. But I still liked the way it turned out and I quickly followed it by painting my kitchen canisters with a nice creamy white before I tackled my first milk painted furniture piece.
What I love most about milk paint is that there are so many different looks that can be produced with just a few products. Whether you like a chippy look, lightly distressed, areas of natural wood showing through, or full coverage, it can be yours. You just need to dive in and start experimenting. If a piece doesn’t work out exactly to your liking, it can usually be reworked without too much effort.
The best part for me was learning to be adventurous and just go for it! I like to think that there are no failures, just lessons, and I have learned a lot! Ha ha!
Have questions? I'll do my very best to answer them. Comment below or email me at nancy@freshcoatfinishes.com. And don't forget to subscribe to our mailing list so you'll be notified when new blogs are up!
Happy painting!


